The Legendary 'Sash' No Longer Has To Be JUST For The Bride To Be

So, while we're still on topic of bride to bridesmaid etiquette I thought it was a perfect segway into the next idea.  Call me crazy and I can't believe I'm actually admitting this....but one of the things I was SUPER excited about when I first got engaged was the idea of FINALLY being the one who got to wear the super cute hot pink sash at my bachelorette party.  I was so obessesed with the idea that I created my own stealth mission to tell each of my bridesmaids and also the maid of honor, individually at different times, to make sure and get me "the sash."  I threatened each of them that I would kick them out of the wedding if they forgot.  Ok, that was a lie. I didn't go bridezilla on them, however it was important enough to me that I really wanted to make sure they wouldn't forget.  Needless to say, they didn't. 

Since my bachelorette party was 8 months in advance, I made sure I'd have PLENTY of opportunities to wear the fab sash. It's already looking a little tattered, but I love it just as much now as the day I opened it.  I told you; I'm obsessed.

When the bachelorette party rolled around, I wanted to show my appreciation to the girls for all the hard work and planning that went into the bachelorette party float trip.  They really went above and beyond in every aspect and I couldn't have been more appreciative! Tara, the craftsy bridesmaid, spent hours upon hours handmaking each invitation that went out.  I personally think they'd fit in really nice at The Nelson Art Gallery--don't you think?


Instead of just getting us a campsite for all of us to set up tents, which mind you would have been a complete disaster as we were well into the celebration by the time we got down to the resort, they rented us this pimped out (in a rustic kind of way) cabin full of space for all of us girls.  Freakin'. Blast.


To show my appreciation for all they had done I decided to make them their very own sashes.  When I decided to take on this little project, it sounded a little easier than it actually was so I'd advise to plan accordingly.  All in all, it took about 6 hours, over the span of a few days.  When I set out on the journey of gathering supplies, I realized fairly quickly that Hobby Lobby needs desperate help in thier stocking department.  I mean, who only keeps 1-2 rhinestone iron on letters of each letter of alphabet on hand.  C'mon people!  Needless to say this started a wild goose hunt which entailed my fiance driving all over town including Olathe, Shawnee, Overland Park and Leawood, hitting all the local craft stores until he was finally able to gather the rest of the rhinestone letters I needed to complete my project.  I knew I was marrying him for a reason... :)

Once the letters were all gathered I was finally able to begin.  I had my pink satin material which was super cheap at like $5 total.  I had all the rhinestone letters which added up to about $40 total at $1.99 a piece. Then lastly, Jon picked me up some special glue to make sure the edges of the satin wouldn't fray when cut.  The glue cost about $3-$4 bucks.  So overall the project, depending on how large your bridal party is, will come to about $50.  Not bad for such a personalized gift.

(Suggestion to save $$--I would sign up for the weekly emails from Hobby Lobby which will notify you when iron on letters are half off as that would save you a TON!)

After all supplies were gathered, I then cut each sash at the width I thought would most resemble the sash I was HOPING AND PRAYING to get myself.  I eyeballed it--no need for rulers girls (unless you're obsessive compulsive.)  The rest is pretty self explanatory--position the letters, grab and iron and Voila!  Don't forget when all letters are ironed on to whip out that glue and glue down every edge of the sash to keep it from fraying. 

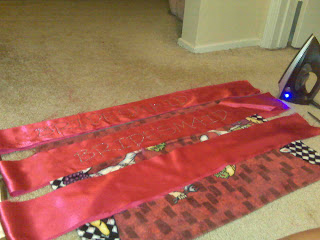
Use thick towel when ironing letters

Iron On Rhinestone Letters

(Almost Completed) Bridesmaid Sash


Now, the last piece of the puzzle that I ALMOST forgot was an object necessary to hold the sash together so the girls could actually wear the pretty thangs.  I ran back to the craft store and bought those Gi-Gan-To safety pins that look like they should be used to hold a diaper on.  I then bought a pack of big 'ol rhinestones to snazz them up a bit.  Got home, heated the glue gun and glued those puppies onto the safety pin.  Effortless and a super cute final touch to bring the FAB sashes to life.

Simple.  Easy.  and SO SO Special.  

Will You Be My Bridesmaid??

Our journey of wedding planning first began when we decided on our bridal party.  We have an amazing core group of friends that we spend time with whenever we can which is just about every weekend.  We've all been through alot together, so the decision was pretty easy. 

We learned that traditionally brides & grooms were to have immediate family members as part of the bridal party.  Because my fiance and I have very close knit families, we decided to honor them in a more intimate way.  Of course those details will fall in a later post....like that teaser?  Ha.

We decided on 3 of my closest girlfriends and 3 of Jon's closest 'man-friends' (Nice Sex&TheCity Reference) to make up our little bridal party of 6.  Jon, being the man of few words that he is, made a few phone calls and that was that.  Me on the other hand went a bit of a different route. As stated in an earlier post, I struggled in finding creative ideas to ask my girlfriends to do me the honor.  I came across a few online, but they just didn't seem to fit.  So, I decided to write them each a personalized note which somehow turned into cute little poems written for each of the girls.  I'm going to pass along tid bits from the poems, the parts that are more 'universal' and not so personal to my friendships.  These poems could be tweaked if necessary to personalize for your bridesmaids!

The poems each began with "Just a little note from the Bride To Be"

"We've shared alot over the years, ups & downs and many 'Cheers!'"
"I always knew there was something special about you; your strength, your spirit always shined through"
"I always knew you were a different kind of friend, loyal no matter what and to the end"
"When it came to guys we tried out quite a few, between _____ & _____ we always knew something better awaited, our perfect match, and with patience I've finally found my perfect catch"
"With a wedding to plan, parties showes and more; I couldn't imagine anything more.  Than having you by my side every step of the way, as one of my Bridesmaids!"
"Now the day has come for me to marry my perfect catch, but when it comes to friendship...you girls are my perfect match"
"Parties, float trips, showers and my wedding day, I want you girls there every step of the way....As my Bridesmaids"
"Now my wedding day is here and I would be so honored to have you as my Maid of Honor"


So, there ya have it!  A few snippets of the poems I wrote for my 3 amazing gals.  After the poems were completed I decided to turn them into a personalized photo album made up of cute pictures we have taken together throughout the years.  I used Facebook in gathering up all the photos and had them printed at my local Walmart.  While waiting for my pictures I was able to find a few little photo albums from Walmart that worked perfect....and at $1 a piece! This is the only photo I could find online to show what type of photo album I'm referring to.  Obviously this album has a hideous cover but most allow you to slide out the cover and put a photo of your choice as the album cover--super cute!


I used Powerpoint to type up the poem (of course in my wedding colors), printed it right out and wa-la!  I trimmed around the poem so as to make several snippets of paper which I then slid into the photo album pages.  As each page was flipped there was a verse of the poem directly followed by one of the cute photos I had printed of me and the girls.

It was such a sentimental moment for all of us and hopefully one they will always remember.  I wanted them to realize how honored I am to have them as friends and how honored I would be as a bride to have them by my side throughout this amazing journey.  Needless to say it was a very (budget friendly) success!


My Maid of Honor, Shelbe

My Two BEAUTIFUL Bridesmaids with their albums


Our Artsy Craftsy Wedding FULL of Love

No worries...this blog isn't focused on Jon & I's mushy gushy love story because number one--our love story isn't mushy gushy and number two--that stuff is all to land on our wedding website NOT this blog. I promise.

When Jon & I got engaged back in April....I was SO excited not only to marry my cute lover boy, but because I was so pumped to have everyone around me that I love on a day filled with love.

The Night Jon Purposed!!!!!
I have amazing friends and an even more amazing family. I wanted to take this engagement/wedding planning as an opportunity to let everyone around us that we love SO much, know how important they are to us by asking them to be a part of our big day.

This began when we decided on our super small bridal party. Being Anne, I couldn't just call my lover girls up and spat out, "Will you pppllleeeaassee be my bridesmaid." I really wanted to honor them and show them how lucky I would be, as a bride, to have these wonderful women by my side. That's when I officially embarked on my journey to add a personalized touch of love to every aspect of our wedding.

In the beginning I began 'googling' in an attempt to find creative ways and ideas to ask my homegirls to be my bridesmaids. To say I hit a brick wall would be an understatement...phew. I realized if I wanted to be creative, I was on my own. I then began looking into ideas on how to ask our cute lil' flower girls to do us the honor. There were a few neat ideas that I could at least build upon.  And the list goes on and on....which is where my idea to create this blog came from. There were no resources out there to help me get started on my journey of putting a little touch of Jon & Anne love into our wedding...really personalizing all that we could.

And there ya have it folks--the purpose of this sweet little blog called "Our Wedding Made From Love." Simple as that.

Stay tuned...............................